In “Protecting Your Home: Dealing with a Leaking Roof,” this article discusses the importance of promptly addressing a leaking roof and explores the risks associated with prolonging its repair. By examining the potential consequences and offering practical solutions, this article aims to empower homeowners with the knowledge necessary to take immediate action, safeguarding their homes from further damage caused by a leaking roof.
Inspecting Your Roof
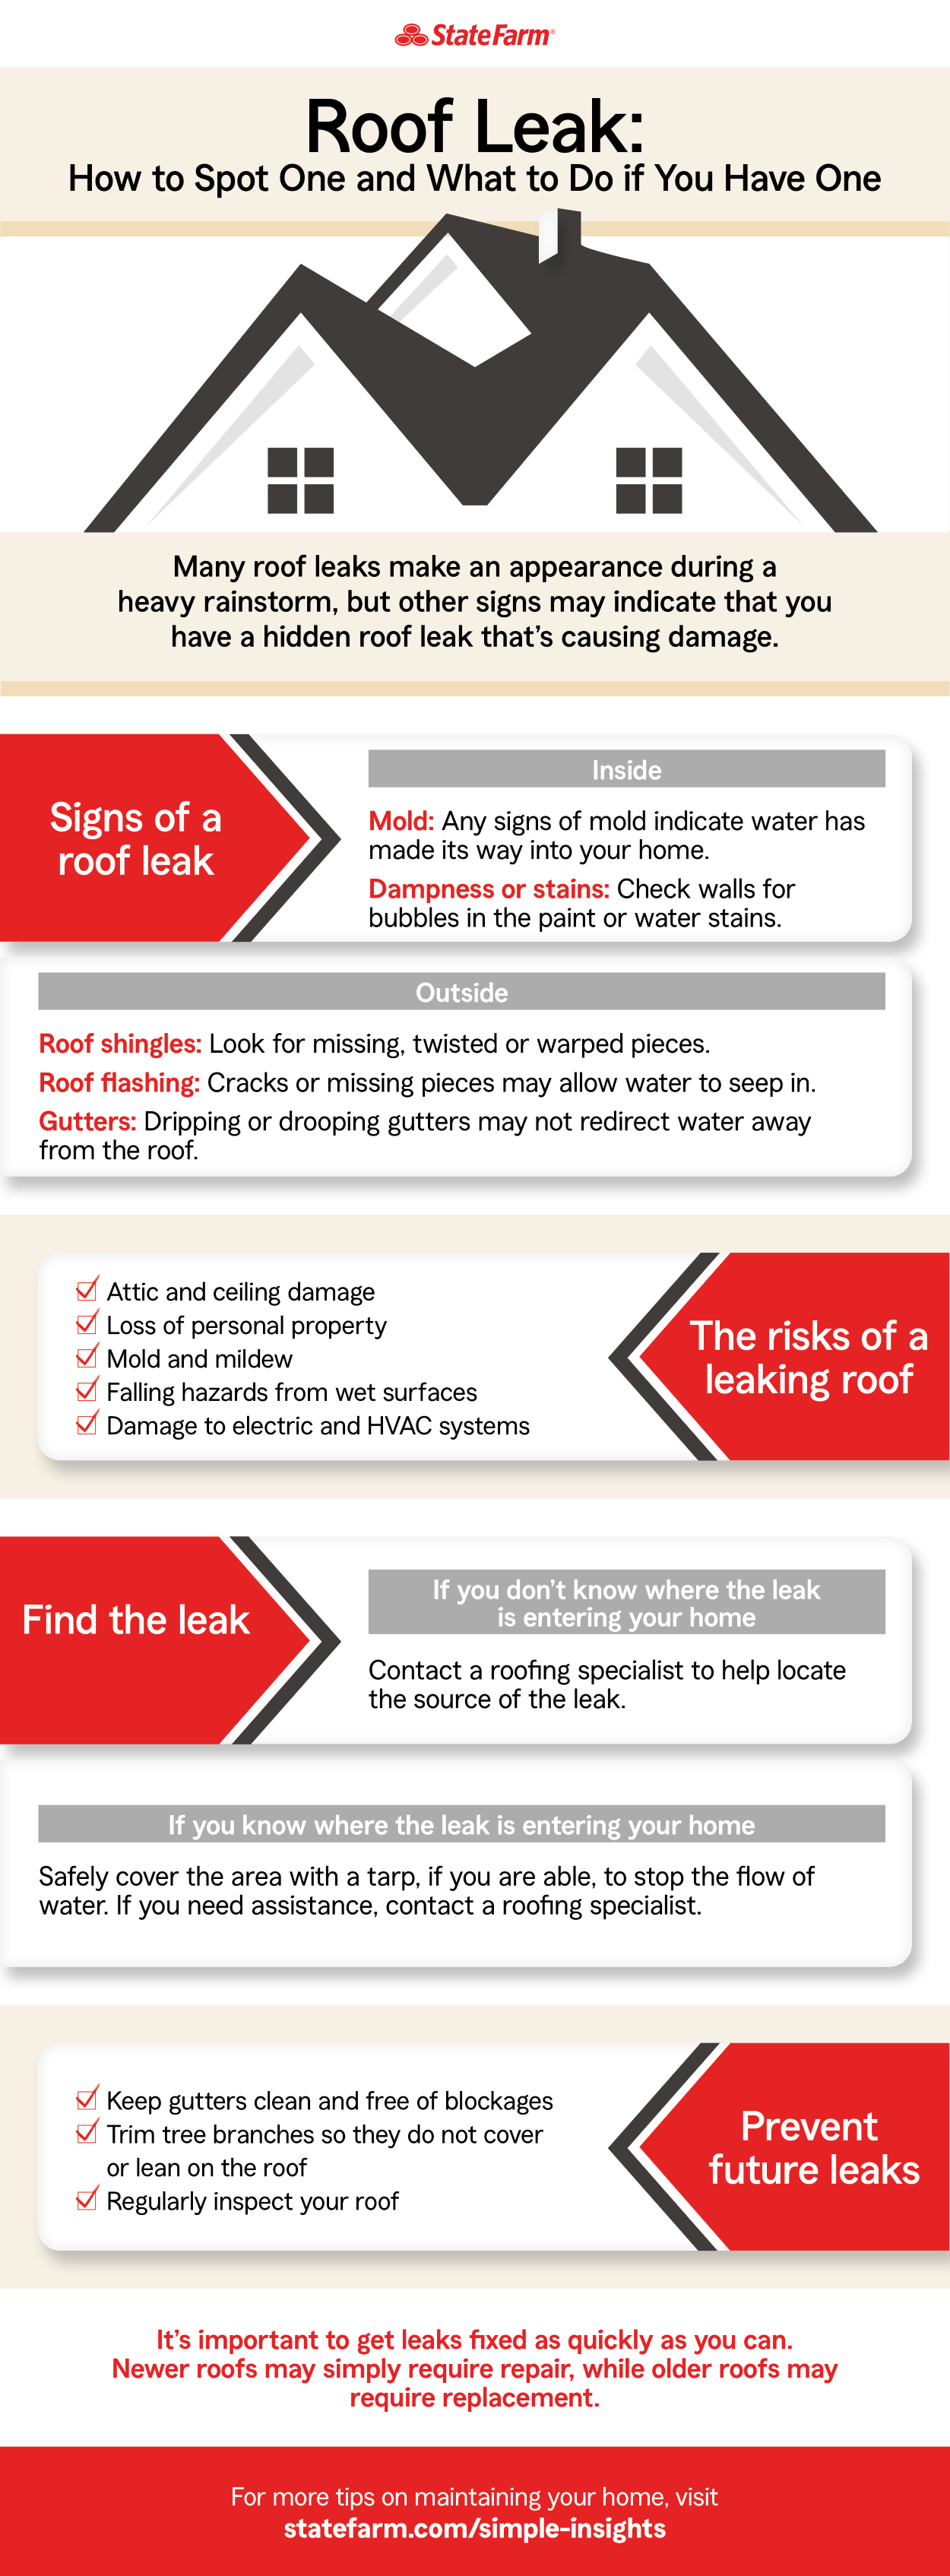
Signs of a Leaking Roof
Inspecting your roof regularly is essential to prevent serious damage caused by leaks. Knowing the signs of a leaking roof can help you identify issues early and take appropriate action. Some of the signs to look out for include:
- Water stains on ceilings or walls
- Damp or musty odors in your home
- Water dripping or pooling in the attic
- Discolored or warped shingles
- Cracked or missing tiles
- Peeling paint or wallpaper
- Sagging or bowing in the roof structure
If you notice any of these signs, it’s important to investigate further to determine the source of the leak and address it promptly.
Potential Causes of Roof Leaks
Understanding the potential causes of roof leaks can assist you in pinpointing the issue accurately. Some of the common causes include:
-
Damaged or Missing Shingles: High winds, severe weather conditions, or aging can cause shingles to crack, curl, or go missing. This compromises the integrity of your roof, allowing water to seep in.
-
Faulty Flashing: Flashing is the material installed around chimneys, skylights, vents, and other areas where the roof meets a vertical surface. If the flashing is improperly installed or deteriorates over time, water can penetrate through the gaps.
-
Clogged Gutters and Downspouts: When gutters and downspouts are clogged with debris, water can overflow onto the roof and lead to leaks. Proper maintenance and regular cleaning can prevent this issue.
-
Damaged or Improperly Installed Roofing Materials: Poor workmanship during installation can result in faulty roof components, such as improperly sealed seams or inadequate underlayment. This can lead to water infiltration.
-
Ice Dams: In cold climates, ice dams can form along the edges of a roof, preventing melting snow from draining properly. The trapped water can then seep into the roof, causing leaks.
It’s important to be aware of these potential causes so that you can address them during roof inspections and repairs.
When to Inspect Your Roof
Regular roof inspections are crucial for detecting and resolving issues before they escalate. You should inspect your roof at least twice a year, ideally in the spring and fall. Additional inspections are recommended after severe weather events, such as hailstorms or high winds.
During the inspection, carefully examine the roof surface for signs of damage, such as cracked or missing shingles, as well as any potential sources of leaks, such as damaged flashing or clogged gutters. Promptly addressing any issues will help prolong the lifespan of your roof and prevent costly repairs down the line.
Tools Needed for Roof Inspection
To properly inspect your roof, it’s important to have the right tools on hand. Some essential tools for roof inspection include:
-
Ladder: A sturdy ladder is necessary to safely access your roof. Ensure it is in good condition and properly positioned.
-
Safety Harness: To ensure your safety while working at heights, a safety harness or fall protection system is recommended.
-
Flashlight: A flashlight will help you see in dimly lit areas of the attic or under the roof.
-
Binoculars: Binoculars can be used to inspect the roof surface from the ground, allowing you to spot any visible damage or signs of wear.
-
Notepad and Pen: Take notes during your inspection to keep track of any issues or areas that require attention.
By having these tools readily available, you can conduct a thorough and efficient roof inspection.
Temporary Roof Repairs
Identifying the Leak
When you discover a roof leak, it’s important to identify the source accurately to implement temporary repairs. Start by examining the affected area inside your home. Look for water stains, dripping water, or any other signs of moisture. Trace the water path to locate the spot on the roof where the leak is originating.
It’s essential to catch leaks early, as they can cause significant damage if left untreated. Therefore, identifying the leak promptly will help you mitigate further water intrusion and prevent additional damage to your property.
Using Tarps or Plastic Sheeting
Temporary roof repairs often involve using tarps or plastic sheeting to provide immediate protection against water infiltration. Here’s how to do it:
-
Measure the affected area: Determine the size of the tarp or plastic sheeting needed to cover the damaged section of the roof.
-
Secure the tarp or plastic sheeting: Use sturdy ropes or bungee cords to secure the tarp or plastic sheeting to the roof. Ensure it is pulled tight to prevent water from pooling and seeping underneath.
-
Cover the damaged area: Position the tarp or plastic sheeting over the damaged section, extending it beyond the affected area to ensure full coverage.
Tarps and plastic sheeting are effective temporary solutions to prevent water from entering your home until permanent repairs can be made.

This image is property of ejm7yhb8aqs.exactdn.com.
Applying Roofing Cement
Roofing cement, also known as mastic or asphalt roof cement, can be used to seal small cracks or gaps temporarily. Here’s how to apply it:
-
Clean the damaged area: Remove any debris or loose materials from the damaged section of the roof using a stiff brush or broom.
-
Apply the roofing cement: Using a putty knife or trowel, spread a generous amount of roofing cement over the crack or gap. Ensure the cement extends beyond the damaged area to create a watertight seal.
-
Smooth the surface: Smooth the roofing cement with the putty knife or trowel to create an even surface that will prevent water from seeping in.
Roofing cement is particularly useful for minor repairs and can provide temporary relief until permanent solutions can be implemented.
Utilizing Roofing Tape
Roofing tape, also known as roof patch tape or roof repair tape, is another option for temporary repairs. It is a self-adhesive tape made of a durable, weather-resistant material. Follow these steps to utilize roofing tape:
-
Clean the damaged area: Remove any dirt or debris from the damaged section of the roof using a brush or cloth.
-
Cut the roofing tape: Measure and cut the roofing tape to match the size of the damaged area, ensuring it extends beyond the affected zone.
-
Apply the roofing tape: Peel off the backing of the roofing tape and carefully place it over the crack or gap, pressing down firmly to create a secure bond.
Roofing tape provides an easy and convenient way to cover small holes or gaps temporarily, effectively preventing water intrusion.
Benefits and Limitations of Temporary Fixes
Temporary roof repairs offer several benefits, including:
-
Immediate Protection: Temporary solutions like tarps, plastic sheeting, roofing cement, and roofing tape can provide immediate protection against water intrusion, safeguarding your home and belongings.
-
Cost-Effective: Temporary fixes are often more affordable than extensive roof repairs or replacements, making them a practical option for managing leaks on a tight budget.
-
Temporary Relief: If you need time to arrange for professional repairs or a complete roof replacement, temporary fixes can provide temporary relief, preventing further damage until a permanent solution is implemented.
However, it’s important to note that temporary fixes have limitations:
-
Limited Lifespan: Temporary repairs are intended for short-term use. They are not a permanent solution and may require ongoing maintenance or eventual replacement.
-
Reduced Aesthetic Appeal: While temporary fixes can prevent further damage, they may not restore the original appearance of your roof. They are functional but may not blend seamlessly with the existing roofing materials.
-
Potential for Further Damage: If temporary repairs are not done correctly, they may not effectively prevent water intrusion or could even cause damage to the roof structure.
Ultimately, temporary fixes should be seen as a temporary measure until professional repairs or a complete roof replacement can be carried out.
Hiring Professional Roofers
When to Call a Professional Roofer
While temporary repairs can be effective in certain situations, there are instances when it is best to call a professional roofer. Consider reaching out to a professional if:
-
The source of the leak is difficult to identify or access: Some leaks may be hidden or located in hard-to-reach areas of the roof. A professional roofer has the expertise and tools to accurately locate and address such leaks.
-
The damage is extensive: If the extent of the damage is significant or affects a large portion of the roof, professional repairs or a roof replacement may be necessary.
-
Safety concerns: Working on a roof can be dangerous, especially if you are not comfortable with heights or lack proper safety equipment. Professional roofers are trained to work in these environments and have the necessary safety gear.
-
Time constraints: If you are unable to dedicate sufficient time or effort to properly address the roof leak, hiring a professional allows you to delegate the task and ensure it is resolved efficiently.
Choosing a Reputable Roofing Contractor
When selecting a roofing contractor, it’s crucial to choose a reputable and reliable professional. Consider the following factors when making your decision:
-
Experience and Expertise: Look for a contractor with extensive experience in roof repairs and replacements. A knowledgeable contractor will have the expertise to accurately assess and address your specific roofing issue.
-
Reputation and References: Research the contractor’s reputation by reading reviews, asking for references, and checking with local homeowner associations. A contractor with a solid reputation is more likely to provide quality workmanship and reliable service.
-
Licensing and Insurance: Ensure the contractor holds the necessary licenses and insurance coverage. This protects both you and the contractor in the event of accidents or unforeseen issues during the project.
-
Warranty: Inquire about the contractor’s warranty policy. A reputable contractor will stand behind their work and offer a warranty that covers any potential issues or defects.
-
Written Estimates and Contracts: Request written estimates from multiple contractors to compare prices and services. Once you’ve chosen a contractor, make sure to have a detailed contract that outlines the scope of work, materials used, timeline, and payment terms.
By carefully considering these factors, you can hire a professional roofing contractor who will provide high-quality workmanship and ensure your roof is repaired or replaced to the highest standards.
Getting Multiple Quotes
Obtaining multiple quotes from various roofing contractors is crucial to ensure you are getting a fair price and quality service. When requesting quotes, provide each contractor with the same information about the leak or damage, so they can assess the situation accurately. This will enable you to compare the quotes on an equal basis.
Additionally, consider other factors beyond price, such as the contractor’s reputation, experience, and warranty, when making your decision. While cost is an important consideration, it should not be the sole determining factor in selecting a roofing contractor.

This image is property of www.statefarm.com.
Checking for Insurance and Licensing
Before hiring a roofing contractor, it’s vital to verify their insurance and licensing information. This helps protect you from potential liabilities and ensures that the contractor meets the necessary legal requirements. Here’s what to look for:
-
General Liability Insurance: The contractor should have general liability insurance to cover any damages or injuries that may occur during the project. Request a copy of their insurance certificate and ensure it is up to date.
-
Worker’s Compensation Insurance: Verify that the roofing contractor carries worker’s compensation insurance. This protects you from being held liable for any injuries sustained by the workers while on your property.
-
License and Permits: Check if the contractor holds the appropriate licenses and permits required by your local authorities. Unlicensed contractors may not have the necessary qualifications or knowledge to perform the work correctly.
By confirming the insurance and licensing credentials of a roofing contractor, you can have peace of mind knowing that you are working with a qualified and responsible professional.
Understanding the Scope of Work
Before work begins, it’s important to have a clear understanding of the scope of work involved in the roof repair or replacement. A detailed scope of work helps you set expectations and ensures that both you and the contractor are on the same page. Here are some key aspects to consider:
-
Materials: Discuss the type and quality of materials that will be used for the repairs or replacement. Ensure they meet your expectations and the necessary industry standards.
-
Timeline: Determine the expected timeline for the project. Understand any factors that may affect the timeline, such as weather conditions or material availability.
-
Disposal of Materials: Clarify how debris and old roofing materials will be removed and disposed of. Inquire whether the contractor will handle this or if you are responsible for arranging disposal.
-
Workmanship Warranty: Understand the warranty provided by the contractor for their workmanship. A warranty demonstrates the contractor’s confidence in their work and provides you with recourse if any issues arise.
Understanding the scope of work helps avoid misunderstandings and ensures that the contractor meets your expectations throughout the project.
Roof Repair vs. Roof Replacement
Assessing the Extent of Damage
Determining whether you should opt for roof repair or a complete roof replacement depends on assessing the extent of the damage. Consider the following factors:
-
Age of the Roof: Roofs have an average lifespan, with shingle roofs lasting around 20-25 years and tile or metal roofs lasting longer. If your roof is nearing the end of its expected lifespan and has significant issues, a replacement may be more cost-effective in the long run.
-
Number and Severity of Issues: Evaluate the number and severity of issues affecting the roof. If the damage is localized and can be resolved through repairs, it may be more practical to repair the affected areas. However, if multiple areas are compromised or the damage is extensive, a replacement may be necessary.
-
Overall Condition: Consider the overall condition of the roof. If the roof is showing signs of deterioration, such as widespread cracking or curling shingles, it may indicate that a replacement is warranted to ensure the structural integrity of the roof.
-
Cost Analysis: Calculate the cost of repairs versus the cost of a replacement. While repairs may be initially less expensive, ongoing repairs and maintenance costs can add up over time. A thorough cost analysis can help you determine the most cost-effective option in the long term.
Factors Influencing Repair versus Replacement
Several factors influence the decision between repair and replacement, including:
-
Extent of Damage: The extent of the damage plays a significant role in determining whether repairs are sufficient or if a full replacement is necessary. Extensive damage may indicate that a replacement is the most viable option.
-
Roofing Material: Different roofing materials have varying lifespans and repair capabilities. Some materials, such as asphalt shingles, are more easily repaired, while others, like slate or metal, may require more intensive repairs or a complete replacement.
-
Current and Future Needs: Consider your current and future needs when deciding between repair and replacement. If you plan to sell your home in the near future, a replacement with a newer, more durable roof may be a selling point. On the other hand, if you plan to stay in your home for an extended period, repairs may be a more cost-effective option.
-
Energy Efficiency: Upgrading to more energy-efficient roofing materials during a replacement can provide long-term savings on energy bills. If your current roof lacks adequate insulation or is not energy-efficient, a replacement may be a wise investment.
Cost Considerations
Cost is an important factor when deciding between repair and replacement. Typically, repairs are less expensive upfront than a complete roof replacement. However, it’s important to consider the long-term cost implications.
While repairs may seem more affordable initially, ongoing maintenance and recurring leaks can accumulate additional costs over time. A replacement, though more expensive upfront, may provide a longer-lasting solution with fewer ongoing expenses.
Additionally, consider any potential savings related to a roof replacement, such as improved energy efficiency or reduced insurance premiums. These factors can help offset the initial cost of a replacement in the long run.
Long-Term Benefits and Consequences
When weighing the decision between repair and replacement, consider the long-term benefits and consequences of each option. Here’s what to consider:
-
Repairs: Repairing only the necessary areas can provide short-term relief and help extend the lifespan of your roof. However, it’s important to monitor the roof closely for potential recurring issues and budget for ongoing maintenance.
-
Replacement: A full roof replacement provides the opportunity to upgrade to newer, more durable materials and ensure the long-term integrity of your roof. This can provide peace of mind, increased energy efficiency, and potentially enhance the value of your home.
Ultimately, the decision between repair and replacement depends on the specific circumstances of your roof, your budget, and your long-term goals. Consulting with a professional roofer can help you make an informed decision based on expert advice.
Preventing Future Roof Leaks

This image is property of cdn.frontdoorhome.com.
Regular Roof Maintenance
Regular roof maintenance is essential to prevent future roof leaks and extend the lifespan of your roof. Some maintenance tasks to consider include:
-
Clearing debris: Remove leaves, branches, and other debris that can accumulate on your roof, as they can trap moisture and contribute to leaks.
-
Inspecting for damage: Conduct regular inspections to check for any signs of damage, such as cracked or missing shingles, damaged flashing, or deteriorated seals.
-
Cleaning gutters and downspouts: Regularly clean your gutters and downspouts to ensure proper water drainage. Clogged gutters can lead to water overflow, which can damage your roof.
-
Trimming surrounding trees: Trim back tree branches that may be in close proximity to your roof. Falling branches or rubbing against the roof can cause damage and allow water to infiltrate.
By implementing a regular maintenance routine, you can identify and address potential issues before they develop into major leaks.
Cleaning Gutters and Downspouts
Clogged gutters and downspouts can lead to roof leaks and water damage. Regularly cleaning and maintaining them is an essential part of roof maintenance. Here’s how to do it effectively:
-
Safety first: Use a sturdy ladder and ensure it is positioned securely. Wear appropriate personal protective equipment, such as gloves and safety glasses.
-
Remove debris: Start by removing leaves, twigs, and other debris from the gutters using a small garden trowel or scoop. Dispose of the debris in a bag or compost pile.
-
Flush the gutters: After removing the debris, use a garden hose with a nozzle attachment to flush out any remaining dirt or small particles. Start from the end furthest from the downspout and work your way towards it.
-
Unblock downspouts: Check that the downspouts are clear of any obstructions. Use a plumber’s snake or a strong stream of water to dislodge any clogs. Ensure the water flows freely out of the downspouts.
By regularly cleaning your gutters and downspouts, you can maintain proper water drainage and reduce the risk of water damage and leaks.
Trimming Surrounding Trees
Tree branches in close proximity to your roof pose a risk of damage and roof leaks. Trimming back these branches is essential to protect your roof. Follow these steps:
-
Identify problem branches: Inspect the trees surrounding your roof and identify branches that are hanging over or touching the roof.
-
Obtain the necessary tools: Use a ladder, pruning saw, and a pair of long-handled pruning shears to safely and effectively trim the branches.
-
Safely trim the branches: Carefully trim back the problem branches, starting from the outside and working your way in. Make clean cuts just outside the branch collar, which helps with healing.
-
Dispose of the cut branches: Gather and dispose of the cut branches appropriately, following local waste disposal guidelines.
Regularly trimming tree branches near your roof minimizes the risk of damage and prevents leaves and debris from accumulating, reducing the likelihood of leaks and other roof issues.
Ensuring Proper Attic Ventilation
Proper attic ventilation plays a crucial role in preventing roof leaks and maintaining the health of your roof. It helps regulate temperature and moisture levels, minimizing the risk of condensation and moisture buildup that can lead to mold or rot. Here’s what you can do to ensure proper attic ventilation:
-
Inspect attic vents: Regularly check the condition of your attic vents. Ensure they are free of obstructions, such as debris or bird nests. Clear away any blockages to allow for optimal airflow.
-
Install ridge and soffit vents: If your attic lacks proper ventilation, consider installing ridge and soffit vents. Ridge vents are installed along the peak of the roof, while soffit vents are located under the eaves. This facilitates the flow of fresh air into the attic and the exit of hot, moist air.
-
Consider attic fans: In areas with high humidity or limited natural airflow, installing an attic fan can help improve ventilation. An attic fan helps expel excess heat and moisture, reducing the risk of roof damage.
By ensuring your attic is properly ventilated, you can maintain a healthy roof and minimize the potential for leaks and other moisture-related issues.
Inspecting Flashings and Seals
Flashing and seals play a crucial role in preventing water infiltration around critical areas of the roof, such as chimneys, skylights, and vent pipes. Regularly inspecting and maintaining these components is essential. Here’s what to do:
-
Check for damage: Inspect flashing and seals for signs of damage, such as cracking, lifting, or deterioration. Pay close attention to areas where the flashing meets the roof surface or other structures.
-
Repair or replace damaged areas: If you notice any damage, repair or replace the affected flashing or seals promptly. Use appropriate sealants or roofing cement to create a watertight seal.
-
Maintain caulking and sealants: Regularly inspect and maintain caulking and sealants around flashings, vents, and other areas prone to leaks. Clean away any debris or dirt, and reapply caulking or sealant as needed to maintain a tight seal.
By regularly inspecting and maintaining flashings and seals, you can ensure they perform optimally, effectively preventing water intrusion and protecting your roof from leaks.
Insurance Coverage for Roof Leaks
Understanding Homeowner’s Insurance
Understanding your homeowner’s insurance policy is crucial when dealing with roof leaks and potential claims. Here are some key points to consider:
-
Coverage Types: Homeowner’s insurance typically provides coverage for property damage caused by specific events, such as storms, fire, or vandalism. Review your policy to determine if roof leaks fall within the covered perils.
-
Deductibles: Familiarize yourself with your policy’s deductible, which is the amount you are responsible for paying out of pocket before the insurance coverage applies.
-
Policy Exclusions: Review the policy exclusions section to understand any situations or circumstances in which roof leaks may not be covered. For example, some policies may exclude coverage for leaks resulting from lack of maintenance or wear and tear.
-
Policy Limits: Be aware of any limits on coverage for roof leaks. Some policies may cap coverage based on the age of the roof or a percentage of the overall policy coverage.
-
Additional Coverages: Certain insurance policies may offer optional endorsements or riders specifically for roof leaks. Consider adding these coverages if you live in an area prone to weather-related roof damage.
Understanding the specifics of your homeowner’s insurance policy helps you navigate the claims process confidently and ensures you receive the coverage you are entitled to.

This image is property of eagleeyeroofs.com.
Reviewing Roof Leak Coverage
When reviewing your homeowner’s insurance policy for roof leak coverage, pay attention to the following:
-
Covered Perils: Check if the policy covers roof leaks caused by specific perils, such as hail, wind, or fire. Understand the circumstances under which coverage applies.
-
Documentation Requirements: Familiarize yourself with any documentation requirements for submitting a claim. This may include providing photos, repair estimates, or proof of maintenance.
-
Policy Limitations: Understand any limitations on coverage, such as coverage caps or exclusions related to certain types of roofs or roofing materials.
-
Additional Living Expenses: If roof damage results in the need to temporarily live elsewhere during repairs, check if your policy covers additional living expenses, such as hotel accommodations or meals.
-
Deductible: Determine your policy’s deductible for roof leak claims. Consider the cost of repairs compared to the deductible to evaluate the viability of filing a claim.
Reviewing the details of your policy’s roof leak coverage ensures you have a clear understanding of what is covered, allowing you to make informed decisions when filing a claim.
Filing an Insurance Claim
If you experience a roof leak, follow these steps to file an insurance claim effectively:
-
Document the damage: Take photos or videos of the affected areas, both on the roof and inside your home. This documentation serves as evidence for your claim.
-
Contact your insurance company: Notify your insurance company as soon as possible after discovering the roof leak. Follow their guidelines for initiating a claim and provide the necessary information and documentation.
-
Schedule an inspection: Your insurance company may send an adjuster to assess the damage. Be prepared to provide access to your roof and any documentation or evidence supporting your claim.
-
Obtain estimates: Gather estimates from reputable roofing contractors for the necessary repairs. Submit these estimates to your insurance company along with your claim.
-
Review the settlement: Once your insurance company processes your claim, review the settlement offer carefully. If you believe the settlement is insufficient, negotiate with your insurance company or seek professional assistance, such as a public adjuster, to advocate for a fair resolution.
Filing an insurance claim can be a complex process. If you encounter any difficulties, don’t hesitate to seek guidance from professionals who can help you navigate the claims process effectively.
Documenting Damage and Repairs
Proper documentation is critical when dealing with roof leaks and insurance claims. Thoroughly documenting the damage and repairs ensures a smooth claims process and can help maximize your insurance reimbursement. Here’s what to document:
-
Initial damage: Take detailed photos or videos of the roof leak and any resulting damage inside your home. Capture the extent and location of the damage.
-
Temporary repairs: If you implement temporary fixes, document the steps you took and any materials used. Keep receipts or invoices for any purchases related to the temporary repairs.
-
Professional inspections: If you hire professional roofers to inspect the damage and provide estimates, keep copies of their reports, estimates, and any other relevant documentation.
-
Repair process: Document the entire repair process, including before and after photos. Keep copies of invoices, receipts, and any warranties provided by the roofing contractor.
By maintaining comprehensive documentation, you can substantiate your insurance claim and ensure that you are adequately reimbursed for the repairs and related expenses.
Safety Considerations
Working at Heights
Working at heights poses inherent risks, and it’s essential to prioritize safety. When inspecting or repairing your roof, follow these safety guidelines:
-
Use proper equipment: Ensure you have a sturdy and properly positioned ladder that is appropriate for the height of your roof. Consider using a safety harness or fall protection system for additional protection.
-
Wear appropriate footwear: Use non-slip shoes or boots with good traction to prevent slipping on the roof surface.
-
Choose favorable weather conditions: Plan your roof-related tasks for days with good weather conditions to reduce the risk of accidents due to wind or rain.
-
Avoid working alone: Always have someone nearby who can assist you or call for help in case of an emergency.
-
Proper ladder placement: Set up the ladder on a flat, stable surface and ensure it is securely placed. Extend the ladder at least 3 feet above the roofline.
Following these safety precautions when working at heights helps minimize the risk of accidents or injuries and ensures your well-being throughout the roof inspection or repair process.
Using Personal Protective Equipment
Personal protective equipment (PPE) is essential to safeguard yourself when working on the roof. Here are some key PPE items to consider:
-
Safety Glasses or Goggles: Protect your eyes from debris or particles that may be dislodged during roof inspections or repairs.
-
Gloves: Wear durable gloves to protect your hands and fingers from sharp objects, such as nails or roofing materials.
-
Hard Hat: Wear a hard hat to protect your head from falling objects or potential bumps against the roof structure.
-
Non-Slip Shoes or Boots: Use non-slip footwear with good traction to ensure stability when working on the roof surface.
-
Sunscreen and Hat: Protect yourself from the sun’s harmful rays by applying sunscreen and wearing a hat.
Properly using PPE significantly reduces the risk of workplace injuries and helps ensure a safe working environment.
Avoiding Power Lines
When working on your roof, it’s important to avoid contact with overhead power lines. Contact with power lines can result in serious injury or even death. Follow these guidelines to prevent accidents:
-
Be aware of power line locations: Familiarize yourself with the location of nearby power lines and identify areas where they may come into close proximity to the roof.
-
Maintain a safe distance: Ensure you maintain a safe distance of at least 10 feet from power lines at all times. This distance includes both vertical and horizontal clearances.
-
Use non-conductive equipment: When inspecting or repairing the roof, use non-conductive equipment to minimize the risk of electrical shock if it accidentally comes into contact with a power line.
-
Ask for assistance: If the roof or nearby power lines pose a safety risk, consider hiring professional roofers who are trained and experienced in working near power lines.
By adhering to these guidelines, you can significantly reduce the risk of accidents or electrical hazards associated with working near power lines.

This image is property of www.strongguard.com.au.
Getting Assistance When Needed
Seeking assistance when working on your roof can enhance safety and efficiency. Here are some situations where assistance is recommended:
-
Working on steep or slippery roofs: If your roof has a steep pitch or is slippery due to rain or other conditions, consider hiring professional roofers with the necessary equipment and techniques to safely navigate these challenges.
-
Handling heavy or bulky materials: If you need to transport heavy or bulky materials to the roof, enlist the help of others to avoid straining yourself or risking injury.
-
Accessing hard-to-reach areas: When inspecting or repairing hard-to-reach areas of the roof, such as chimney flashings or high peaks, consider having someone assist you by holding the ladder or passing tools or materials.
-
Emergency situations: If you encounter an emergency, such as a sudden storm or a fall from the roof, immediately seek assistance by calling emergency services.
By getting assistance when needed, you can ensure your safety and minimize the risk of accidents or injuries when working on your roof.
Dealing with Interior Water Damage
Recognizing Signs of Water Intrusion
When dealing with a leaking roof, it’s imperative to recognize signs of water intrusion inside your home. Common signs of interior water damage include:
-
Water stains on ceilings or walls: Yellow or brownish stains on ceilings or walls can indicate ongoing or past water intrusion.
-
Warped or sagging ceilings: If your ceiling appears bowed or swollen, it may indicate water damage.
-
Peeling paint or wallpaper: Moisture can cause paint or wallpaper to bubble, peel, or deteriorate.
-
Musty odors: Dampness and mold growth can lead to a musty smell in affected areas.
-
Mold or mildew growth: Visible mold or mildew on walls, ceilings, or other surfaces indicates excessive moisture.
If you notice any of these signs, promptly investigate further and address the source of the water intrusion to prevent further damage.
Addressing Mold and Mildew
One of the potential consequences of a leaking roof is the growth of mold and mildew. If you discover mold or mildew in your home, take the following steps to address the issue:
-
Identify the source: Locate and resolve the source of the moisture that is contributing to mold growth. This may require repairing the roof, improving ventilation, or addressing other areas of moisture intrusion.
-
Remove affected materials: For extensive mold growth, it may be necessary to remove and replace damaged materials, such as drywall or insulation. Consult with professionals in mold remediation to ensure safe and proper removal.
-
Clean surfaces: Clean mold-affected surfaces with a solution of bleach and water or a commercial mold remover. Follow the instructions on the product label and wear appropriate personal protective equipment.
-
Improve ventilation: Enhance ventilation in the affected areas by installing fans, opening windows, or using dehumidifiers to reduce moisture levels.
Addressing mold and mildew promptly and effectively not only protects your home’s structural integrity but also helps maintain a healthy indoor environment.
Repairing Water Damaged Ceilings and Walls
Water damage to ceilings and walls can undermine their structural integrity and compromise their appearance. Here’s how to repair water damaged ceilings and walls:
-
Safety first: Before beginning any repairs, ensure the roof leak or source of the water intrusion has been resolved to prevent further damage.
-
Assess the damage: Determine the extent of the damage, looking for signs of weakened drywall, sagging, or peeling paint.
-
Remove damaged materials: Remove any damaged drywall, plaster, or paneling by cutting out the affected area with a utility knife or reciprocating saw. Take care to avoid cutting into undamaged sections.
-
Replace damaged materials: Measure and cut replacement drywall or other material to fit the opening. Attach it securely using screws or nails. Apply joint compound or spackle to create a smooth surface.
-
Finish the repair: Sand the repaired area to achieve a seamless finish. Prime and paint the area to match the surrounding surface.
Properly repairing water damaged ceilings and walls restores their functionality and appearance, preventing further deterioration and maintaining the value of your home.
Drying Out the Affected Area
After resolving a roof leak, it’s crucial to dry out the affected area thoroughly to prevent mold growth and further damage. Here’s how to effectively dry out a water-damaged area:
-
Remove standing water: If any areas are severely wet, remove standing water using a wet/dry vacuum or towels.
-
Promote airflow: Open windows and doors to increase natural airflow. Use fans or dehumidifiers to improve air circulation and remove excess moisture.
-
Control humidity: Reduce humidity levels by using a dehumidifier or air conditioner. Aim for an indoor humidity level between 30% and 50%.
-
Use absorbent materials: Place absorbent materials, such as towels or dry cloths, on damp surfaces to wick away moisture. Replace them as they become saturated.
-
Monitor progress: Regularly check the moisture levels and the drying progress of the affected area. Ensure that it remains dry to prevent further damage or mold growth.
Properly drying out the affected area helps mitigate damage, prevent mold growth, and restore a dry and healthy indoor environment.
DIY Roof Repair Tips
Sealing Small Cracks and Gaps
Sealing small cracks and gaps in your roof can prevent water intrusion and extend the lifespan of your roof. Here’s how to seal small cracks and gaps:
-
Clean the area: Remove any debris, dirt, or loose materials from the crack or gap using a brush or cloth.
-
Apply roofing cement: Using a putty knife or trowel, apply roofing cement generously into the crack or gap. Ensure the cement fills the entire space and creates a watertight seal.
-
Smooth the surface: Use the putty knife or trowel to smooth the surface and create an even finish. This will prevent water from pooling on the repaired area.
Sealing small cracks and gaps promptly prevents them from widening and causing more significant issues. However, it’s important to note that larger or complex repairs may require professional assistance.
Replacing Shingles or Tiles
Replacing damaged or missing shingles or tiles is essential to maintain the integrity of your roof and prevent leaks. Follow these steps to replace shingles or tiles:
-
Gather necessary materials: Obtain replacement shingles or tiles that match your existing roof. Ensure you have the necessary tools, such as a pry bar, hammer, roofing nails, and roofing cement.
-
Remove the damaged shingle or tile: Carefully lift the shingle or tile above the damaged one. Use a pry bar or hammer to remove any nails, and then lift and remove the damaged piece.
-
Install the replacement shingle or tile: Slide the replacement shingle or tile into place, aligning it with the surrounding pieces. Secure it with roofing nails, and apply a dab of roofing cement on each nail head to provide extra protection against water infiltration.
-
Ensure a proper fit: Ensure the replacement shingle or tile fits snugly and lays flat. Smooth and press down on the edges to make sure it is securely attached.
Properly replacing damaged or missing shingles or tiles prevents water from seeping into your roof and causing leaks. If you are uncomfortable working on your roof or if the damage is extensive, consider hiring a professional roofer.
Cleaning and Maintaining Roof Drains
Roof drains and downspouts play a crucial role in ensuring proper water drainage from your roof. Keep them clean and well-maintained with these steps:
-
Visual inspection: Regularly inspect the roof drains and downspouts for any debris, such as leaves, twigs, or dirt. Remove any blockages by hand or with a small tool.
-
Flushing the drains: Use a garden hose to flush water through the drains and downspouts. This helps ensure they are clear and allows water to flow freely.
-
Check for leaks: While flushing the drains, inspect for any leaks or signs of damage. Make any necessary repairs or replacements promptly.
-
Maintain gutters and guards: Regularly clean gutters and gutter guards to prevent debris from reaching the drains. Ensure gutters are securely attached and sloping correctly for optimal water flow.
By cleaning and maintaining roof drains and downspouts, you can prevent water from backing up on the roof and causing leaks or other water-related issues.
Using Roofing Sealants
Roofing sealants are effective for sealing and protecting certain areas of your roof. Here’s how to use roofing sealants for minor repairs:
-
Clean the area: Remove any loose materials, dirt, or debris from the area you plan to seal. Wipe the surface clean with a cloth or brush.
-
Apply the sealant: Using a caulking gun, apply the roofing sealant generously onto the target area. Ensure the sealant fills any gaps or cracks and creates a watertight seal.
-
Smooth the surface: Smooth the sealant with a putty knife or your finger to create an even finish. This will help prevent water from accumulating on the sealed area.
Roofing sealants are particularly useful for sealing small cracks or gaps and can provide temporary relief until professional repairs can be made.
Safety Precautions
When attempting any DIY roof repairs, it’s crucial to prioritize safety. Follow these safety precautions:
-
Use proper safety equipment: Wear appropriate personal protective equipment, including gloves, safety glasses or goggles, and non-slip footwear with good traction.
-
Work with a partner: When working on the roof, have someone nearby who can assist you or call for help in case of an emergency.
-
Ensure a stable working surface: Use a sturdy and properly positioned ladder. Set it up on a flat, stable surface and extend it at least 3 feet above the roofline.
-
Mind electrical hazards: Be cautious of overhead power lines and avoid contact with them. Use non-conductive equipment when working near power lines.
-
Be aware of weather conditions: Avoid working on the roof during inclement weather or strong winds, as it increases the risk of accidents.
By implementing these safety precautions, you can minimize the risk of accidents or injuries and ensure your safety during DIY roof repairs.
Recurring Roof Leaks: When to Seek Professional Help
Common Causes of Recurring Leaks
Recurring roof leaks can be frustrating and indicative of underlying issues. Some common causes of recurring leaks include:
-
Improper repairs: Inadequate or incomplete repairs may temporarily resolve the leak but fail to address the root cause. This can result in the leak resurfacing.
-
Shoddy workmanship: Poor installation or workmanship during original roof construction or previous repairs can contribute to recurring leaks.
-
Hidden damage: Hidden structural damage, such as deterioration of the roof deck or compromised flashing, may be the underlying cause of recurring leaks. These issues require professional expertise to identify and address effectively.
-
Weather-related damage: Severe weather events, such as storms or hail, can cause extensive damage to your roof. Temporary repairs may not be sufficient to withstand future weather events, resulting in recurrent leaks.
-
Aging materials: As roofing materials age, they become more susceptible to damage and deterioration. Aging shingles, tiles, or flashing can lead to recurring leaks.
Underlying Structural Issues
Recurring leaks can sometimes be indicative of underlying structural issues with your roof. Some potential underlying structural issues include:
-
Roof deck damage: Damage to the roof deck, such as rot or deterioration due to water infiltration, compromises the structural integrity of the roof and can result in recurring leaks.
-
Improper ventilation: Inadequate attic ventilation can lead to excessive heat and moisture buildup, causing condensation and recurrent leaks.
-
Insufficient insulation: Insufficient insulation can contribute to temperature imbalances in the attic, promoting condensation and moisture-related issues.
-
Structural movement: Changes in the structure of your home, such as settling or shifting, may impact the integrity of your roof system. This can lead to recurring leaks if not addressed appropriately.
Addressing underlying structural issues requires the expertise of professional roofers who can accurately assess the situation and provide comprehensive repairs or solutions.
Identifying Hidden Leaks
Identifying hidden leaks can be challenging, as the signs of water intrusion may not be immediately apparent. Professional roofers have the knowledge and tools to identify hidden leaks effectively. They may utilize techniques such as:
-
Thermal imaging: Specialized cameras can detect temperature variations that indicate moisture or insulation issues, helping locate hidden leaks.
-
Moisture meters: Moisture meters measure moisture content in materials, such as insulation or roof decking, to detect hidden leaks that are not visible to the naked eye.
-
Water testing: In some cases, professionals may perform controlled water tests to simulate rain or other water sources and pinpoint the location of hidden leaks.
Identifying hidden leaks accurately is crucial to implementing permanent repairs and preventing further damage to your roof and property.
Professional Inspection and Repairs
When dealing with recurring leaks, consulting with professional roofers is essential. Professional roofers offer the expertise and experience needed to identify the root cause of the leaks and provide effective repairs. Here’s what to expect from a professional inspection and repairs:
-
Thorough assessment: Professional roofers will conduct a comprehensive inspection to assess the entire roof, identifying any potential issues contributing to the recurring leaks.
-
Accurate diagnosis: Based on their findings, professional roofers will diagnose the underlying cause of the leaks and develop a plan for appropriate repairs or further action.
-
Quality repairs: Professional roofers will implement proper repairs using industry-standard materials and techniques. These repairs are designed to address the root cause and prevent further leaks.
-
Warranty assurance: Reputable roofing contractors provide warranties for their workmanship, ensuring that you are protected in the event of further issues related to the repairs.
By relying on professional roofers, you can address recurring leaks effectively, restore the integrity of your roof, and ensure long-lasting protection for your home.
In conclusion, a leaking roof can lead to significant damage if not addressed promptly. By inspecting your roof regularly, understanding the signs and potential causes of leaks, and utilizing temporary fixes when necessary, you can mitigate the effects of leaks on your home. When it comes to hiring professional roofers, carefully select a reputable contractor and obtain multiple quotes. Evaluate the extent of the damage and factors influencing repair versus replacement to make an informed decision. Take proactive measures to prevent future leaks through regular maintenance, cleaning gutters and downspouts, trimming surrounding trees, ensuring proper attic ventilation, and inspecting flashings and seals. Understand your homeowner’s insurance coverage for roof leaks, review your policy, and document damage and repairs when filing a claim. Prioritize safety throughout the process by following appropriate precautions and seeking assistance when needed. Finally, promptly address interior water damage, utilize DIY repair tips for small issues, and seek professional help when dealing with recurring leaks or hidden structural issues. By implementing these steps, you can protect your home and ensure the longevity of your roof.